
Joe Dinwiddie has his own business teaching this art, and building walls for residential and commercial properties for those who aren't interested in building the walls themselves.
This class was held at the Black Mountain Center for the Arts near Asheville, NC. I couldn't believe I actually found someone who teaches this, as I was just looking on the internet for tips and how-to's but had the sense to know there was more to it than a simple 1-2-3 step format. So we contacted Joe and enrolled in the class for this past Saturday.
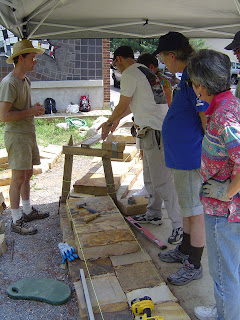
The class started off with some basic instructions on the different components of a wall, and note-taking with Joe answering our many questions.

And then we headed outside to get started. Now our class was the 3rd Saturday class to work on this wall. What is pictured below is what the other 2 classes accomplished in their 8 hour segments. We were to continue where they left off, and the idea is that by the end of the classes, the Black Mountain Center for the Arts will have a nice stone sitting wall outside the pottery studio.

We started by learning how to build a frame out of wood to keep angles and levels true.

We ended up building a frame that wanted to twist to the left, lifting the right leg off the ground so Paul was ingenious and came up with the idea of duck taping a rock to the top of the frame to hold it down.
Frame with the rock
 We went through the tools needed for hammering the rocks into shape, how to use a chisel and what directions to pound the rocks to get the desired shapes and effects.
The hammering was a LOT of work and we found ourselves sufficiently worn out by the end of the day. It truly took a long time to accomplish such a small amount.
 Then we were surprised by some rain for a few hours.
 Once rocks were in place we had plenty of fine-tuning to make sure they were stable, solid and fit snugly together.
 Small spaces and gaps had to be filled in with small rocks and gravel.
 And we always had to make sure things remained level.
 After all final adjustments were made, all vertical spaces were filled in.
 Paul and I came away from the class feeling like this is something we can do. We want to build a more rustic looking wall with smaller, more uneven stones but the same principals will apply as what we learned on Saturday.
After the class Paul and I went to the Dripolator next door to get some hot chocolate and coffee and a little snack.

This is the neatest coffee shop we had been in! It has a very cozy and homey feel and everyone there was either relaxing in the couches and arm chairs or working on their computers at the tables.


 If you are ever in the Asheville area, stop by Black Mountain- it is a very cute town with lots of unique artsy shops and restaurants, and plenty of character!
No comments:
Post a Comment